Note: This article tries to cover everything you need to know about making your own mops, but if you’d rather just buy some brand name mops, check out our mop marker reviews post.
The Ultimate Guide To Home Made Mop Markers
A big part of graffiti culture is experimenting with tools and creating new methods of writing on walls. From this culture of tinkering, sprung one of the most popular graffiti tools of our time… Graffiti mop markers.
No one would be able to pinpoint the first ever use of a mop marker, but early mops were often made out of shoe polish containers and bingo dabbers. Originally, probably with the original shoe polish and bingo ink in them, until writers realized they needed ink that was harder to buff.
Since then, people have made mops out of any and everything. You can go to YouTube and find tens (or hundreds) of videos making mop markers.
If you only take one thing away from this blog post, make it this: A good mop can be made from anything. In the spirit of graffiti culture, go try some shit. Don’t take my word for it. Go mix your own inks, make your own nibs, try your own bottles.
Your Options For Mop Marker Bottles
You can grab empty mop marker bottles online if you’d like, but if you’d rather make your own, here’s a list of the most common bottles used when constructing homemade mops:
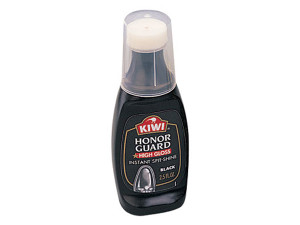
- Shoe polish bottles are super common when making mops, so there’s a reason this is first on the list. Kiwi is one of the most popular brands because of how nice their bottles fit in your hand. You can find them in super markets, shoe stores, or online.
- Deodorant bottles are great for mops if you get the right shape. Look for the roll-on style, which tend to be marker shaped.
- Bingo daubers are a classic in the mop marker game. They are built for ink, and are refillable out of the box, which is handy considering many other mop marker containers are not meant to be refillable and can be a pain in the ass to refill. Bingo daubers come in different shapes and sizes but all seem to work well. You can find these at bingo halls, dollar stores, online, or other variety stores around town.
- I’ve seen glue stick containers used for small mops, and while I personally think they’re too small to be taken seriously, I won’t hate on you if you need a mini/disposable mop. Anything smaller than this, and I would honestly recommend against it. Some of you have emailed me asking about things like chapstick containers, and I just think that when you’re going that small, the juice isn’t worth the squeeze.
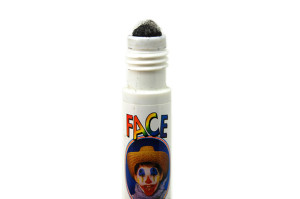
 I’ve heard great things about using Chunky face paint markers, but haven’t used one myself. They’re a great shape, and are already meant for paint. If you’re just getting started, this would be a great place to start. I’ve seen these at the dollar store, costume stores (especially around Hallowe’en), and toy stores.
- Liquid glue pens are great if you find the right kind. The best glue pen I’ve used was made from a pen that had a roller ball (like the roll on deodorant).
- Use your head… The truth is, I could list a million different bottles for you to try, but the only thing that matters is that you choose one, make a mop out of it, get up, learn from your mistakes, and keep putting in work.
 I’ve heard great things about using Chunky face paint markers, but haven’t used one myself. They’re a great shape, and are already meant for paint. If you’re just getting started, this would be a great place to start. I’ve seen these at the dollar store, costume stores (especially around Hallowe’en), and toy stores.
Mop Marker Nib Options Available To You
When it comes to making your own mop, the nib you choose can make or break your marker. A lot of the container options listed above come with nibs made out of absolute dog shit.
Depending on what surfaces you’re writing on, different nibs will be acceptable to you. For example, if you find that most of the surfaces you’re writing on are rough, then you probably don’t want a sponge nib. And if you do use a sponge nib, you want it to be easily replaceable when it tears apart from use.
With that said, you have a few options when it comes to nibs and I’ve listed them below. If you have experience using other materials, please comment below and I’ll add it to the list (and give you credit):
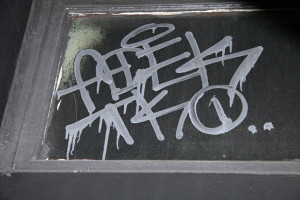
- Sponge nibs are great for smooth surfaces – I’m thinking metal, glass, tiles, subway cars and clean walls. Sponge is the typical stock nib on shoe polish bottles. If you use them on concrete sponge will get torn like wet tissue. Stay offa that! If you’re buying nibs for the re-up, you can find them at arts & crafts stores, dollar stores, hardware stores, probably even gas stations. Basically if you can’t find a sponge then you’re not cut out for the graff game, son.Use an exacto knife or scissors to cut a long rectangular “brick” of the sponge.
- Felt is a classic nib. You can find it at arts & crafts stores and sewing stores, in sheets. Roll it over on itself, then fold it in half.
- Chalkboard brush is also a classic as it’s made of thick, rugged felt. You can find them at office supply stores and will likely have to tear them directly off of a brush.
- A Section of rope is great if you don’t want a clean line, and are more interested in drops and gloopy thick ink tags. I say ink because I think they perform better with inks than paints (your mileage may vary). People generally fold a 3″ (7.5cm) length of rope in half and stuff the two ends into the bottle, leaving a tight loop outside of the bottle. In this case, you’ll want to hold the bottle upside down to wick/juice the marker.
Your Ink Options When It Comes to Mop Markers
When it comes to filling your mop, you’re choosing between a pigment/paint or an ink.
Most paints are a matter of mixing a latex paint with a thinner and these mixtures can safely be left to standin any kind of container.
Inks will generally use a stronger – toxic – solvent which quickly evaporates to dry your tag. There are many solvents which can be used, but most often you will see permanent marker inks based around acetone, xylene, or toluene, and – to a lesser extend – isopropyl alcohol or methanol. (thanks Wikipedia)
It’s important to know that xylene or toluene based inks are not safe to be stored in plastic mop markers. They are a strong enough solvent to eat through the plastic, which is why you see xylene based inks like Smash Ink come in a metal container.
If you’re looking to buy some professionally made ink that’s super hard to buff, I’m including a list of some of the popular brands I’ve used and where possible I provided a link to buy them from Amazon. Here’s the brands I know and have worked with before. In some cases, I’ve left comments and links to how to purchase them on Amazon. In other cases, I’ve left it up to you to decide which you like best:
- Smash Ink – Super high pigment. I’ve just swung a marker with this, not ever owned any myself. The marker I used was super buttery and I loved it. Would love to order some and see how long it lasts.
- Money Shot Ink
- Molotow Cocktail Ink (Speedflow, Coversall)
- Pilot Refill Ink – Pilot’s been in the game for a long time and I love their ink when I get ahold of it. Generally this isn’t an ink I’ll go out and pay for but if I “stumble across” some, I’m a happy dude.
- Garvey XT-70 Violet
- Marsh T-Grade Ink – Probably my go to ink, in terms of how often I find myself filling up markers.
- On The Run 401 Soul Tip Paint – Obviously, anything made by actual graffiti writers is going to be good and worth purchasing if you have the money and want high quality, long lasting tags. Here’s the best place to buy Marsh ink online.
- Molotow High Solid One 4 All
- On The Run .401 Stainless Refill Ink – Buy it online here.
- On The Run .466 Hot Chocolate Ink
- On The Run 484 Refill Ink
- Art Primo Industrial Dye-Based Ink – I dig what Art Primo’s doing and I’m proud to put their dye-based ink on this list. I hope more people give this ink a shot (if this article inspires you to do so, report back in the comments), as I think it deserves more recognition than it gets.
- Art Primo Industrial Paint
- Egg Shell ES-3 Refill Ink
- Molotow Transformer
- Steel Blitz
- Block by Block – This Canadian ink is super-dope. I picked some up recently when I was in Toronto, and I hope this gets more recognition. Block by Block is the truth, made by a writer, used by a writer, and is super super dope.
- Grog Ink – Grog’s a great brand made by writers, for writers. You can buy it online here, and here.
- Grog Paint
- Nero – Some people hate Nero, so I put it on the bottom of the list. Even though these aren’t in order of preference, let me know if you’d like to see it higher.
I recommend you stay away from India ink, which isn’t meant for outdoor use and will generally disappear at the next rainfall.
Here’s an interview of SIZEO, the creator of Block by Block ink, where you see plenty of ink action.
Essential Aspects of Perfecting Your Style and Technique
Mop technique isn’t rocket science. Play around with 2 or 3 and you’ll figure it out. Their are a few key aspects to controlling your lines with mop markers:
- Speed
- Squeeze
- Liquid
- Angle
- Surface
 Remember, it’s great to read about technique, but graffiti’s dirty secret is that nothing makes you good other than getting out there and trying/learning. Keep it moving, get up and get on. Over the span of many years your tags will become clean enough that you can leave both drips and streaks at will. You’ll learn that none of this really matters when using a mop… it’s graffiti after all, so while both styles and aesthetics are respected, it’s good to know how to use each.
When an established writer like ADEK leaves his mark, know that tens of thousands of tags come behind it. He didn’t get there by reading on the Internet, nahmean? Take the knowledge you read today and apply it. Go practise, get better, practise more, get more better. This learning process never really stops.
A fast marker leaves less paint, a slow marker leaves more
The truth is… speed makes a difference when it comes to all forms of graffiti and tagging, and mops are no different.
Moving slower leaves more ink or paint on the surface/wall and the more ink or paint, the more likely you are to have drips.
It boils down to: If you move too fast, your marker leaves streaks, move too slow and you’ll leave drips.
Squeezing your marker will determine your flow
By far one of the best attributes of mop markers are their squeezability. This is where most of your drips will come from, and also plays a part in how fast you can get up.
Similar to using fat caps with spray paint, squeezing allows you to put more paint or ink on the wall in the same amount of time. You will learn over time to be able to squeeze aggressively and move fast, without adding drips or leaving streaks.
There would be no point in my trying to explain how to balance the two, it comes down to millimetres of squeeze and milliseconds of speed. Over time, these variations in speed and squeeze will be defining aspects of your mop marker handstyles.
Paint vs. Ink in markers
Whether you’re using wet inks, or thick, gloppy paint will determine the amount of drips.
Obviously if you’re working with ink, you don’t want to be squeezing the mop at all. Ink is going to drip in general.
Use gravity to your advantage by angling your mop downwards
One of the things that kept fucking with me when I was getting started with mops and steel-tip graffiti markers was that if there isn’t a reservoir of ink for the nib to draw from, your line will dry out… This wreaks havoc on your handstyle and ends up looking terrible.
To stop this from happening, always tilt the mop marker downwards, at an angle. You’ll see that the ink/paint has pooled above the nib, therefor flowing down into it, rather than the pooling in the bottom of the bottle and leaving the nib touching air. Soon the paint in the nib will be used up and the pen will start streaking. No bueno.
The angle doesn’t need to be huge.
So long as you’re holding the marker horizontally the ink should flow. As your marker gets low on paint/ink, you may need to increase the angle but looking at this screenshot you’ll see that it doesn’t need to be much past horizontal to get a good flow.
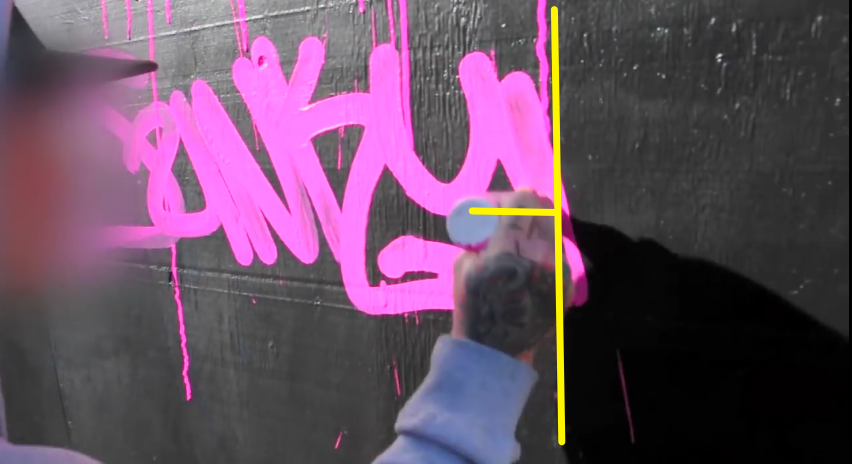
I’ve tried to illustrate the slight angle your mop needs to be on (in yellow), hope it makes things clearer for you.
At first, holding the bottle on a downward angle will seem awkward when you’re reaching up high above your head. The tendency will be to aim the marker up and get as high as possible. Sacrifice the extra inch/centimetres and tilt the pen back down. This will keep your flow juicy and results in cleaner tags.
Angle it even further and you will start to allow for drips. Mix this motion with a squeeze and you’ll get more dramatic drips. Keep it moving too far and you will start seeing drips coming off the wall and just landing on the ground at your feet, so keep it within reason, aight?
Using your mop on different surfaces: Clean, Rough, Dirty, and Bumpy surfaces
When it comes to drips, surface plays a big part. It’s a lot harder to leave no drips when working with ink or etch bath on glass in the rain than it is to leave no drips while using a thick paint on wood in the Sun. Understand what I’m getting at here?
There are thousands of surfaces, thousands of inks, thousands of mops, and you’re reading about making yours from scratch so to cover all the aspects you’d need to consider would be enough to write a book on. Instead, I’m trying to be thorough as hell and make sure you finish the article with every bit of information you could ask for.
Generally, your surface will be described as one of a few options:
- On clean surfaces your marker will slide effortlessly and drips will be a lot easier. If you’re not looking for drips, move quickly and stay in control. Don’t go too wild or you will have ink/paint spatter as you’re doing tags. These surfaces will be mailboxes, metal doors, glass, inside commuter trains, any glossy surface, plexiglass, etc. If you’re looking for drips, slow down, tilt your marker downwards, and give it a squeeze.
- On rough surfaces you’ll likely tear the shit out of your mop tip. In some cases this might be what you’re looking for (maybe your marker isn’t flowing enough) but more than likely, you will prefer spray paint on a super rough surfaces. Think anything that involves rough concrete, rough wood, rusty metal, and any walls made up of broken rocks (you know the kind, right?)
- On dirty surfaces your marker will do well, but the nip will get dirty, and soon your bright yellow will be a dull yellow/brown. Keep that in mind when you’re using a light colour like white, yellow, chrome, etc. This is obviously less of an issue if you’re using a navy blue, dark purple, or black paint. For those that wear cloth gloves when tagging, you might want to follow some people before you by giving a quick wipe down of your surface. This will help your tags last longer, go on cleaner, and be harder to buff. People do basic wipe downs of dirty walls when piecing/bombing, as well.
- On bumpy surfaces you may find your marker slides nicely but hits a lot of bumps. In this case, you will get a much cleaner tag by moving slowly. You will also find you have a LOT of control when you take a deep breath and slow down a little bit. Usually it takes a few years to acknowledge that your marker will jump/skip on a bumpy surface, and recognize you need to slow down.
Are there original recipe pages or books or PDFs for buff proof paint/ ink?
Um, graffiti is artistic when used in the wright manor but I’m trying to figure out who is just painting MOP everywhere in pueblo…just taggers but more realistically some fledgling gang.
No one actually cares abt the manor it’s done because it’s a gang dominance in witch u won’t be able to fucking do anything about it face it you vs a gang
dang mang that was very good review on mops. Covered pretty much every question someone would have before buying a mop.. very nice. The last part on surfaces was cool. I think a lot of young writers end up destroying their tips because they try to write on surfaces without scoping them out first. good stuff again mangys.
Can any paint be used for the mop or does it have to be alcohol based only
?
Hello there I was just wondering if molotow masterpiece ink will work? It is only we have in our local shop…. Please answer quick
I’ve worked with industrial ink pigments,years ago at a yarn plant. I actually hadn’t thought of it in years… It makes a great prank, the Ink takes almost a month of showering to fade from skin, so a dab on a doorknob leads to great times… People often don’t realize how regularly they touch their face lolol. I’m intrigued, I think I’ll experiment with some attempts at mixing pigment into ink for a mop, wish me luck!
I’m curious to hear if anyone on here has used airbrush paint in there mops specifically createx airbrush paint. I’ve used createx on hobby cars and such and it is very permanent and pigmented and will stick to just about any surface.